Git is an open-source distributed version control system that makes collaborative software projects more manageable. Many projects maintain their files in a Git repository, and platforms like GitHub have made sharing and contributing to code accessible, valuable, and effective.
Open-source projects that are hosted in public repositories benefit from contributions made by the broader developer community through pull requests, which request that a project accept changes you have made to its code repository.
This tutorial will guide you through making a pull request to a Git repository through the command line so that you can contribute to open-source software projects.
Prerequisites
You should have Git installed on your local machine. You can check if Git is installed on your computer and go through the installation process for your operating system by following this guide.
You’ll also need to have or create a GitHub account. You can do so through the GitHub website, github.com, and can either log in or create your account.
As of November 2020, GitHub removed password-based authentication. For this reason, you will need to create a personal access token or add your SSH public key information in order to access GitHub repositories through the command line.
Finally, you should identify an open-source software project to contribute to. You can become more familiar with open-source projects by reading through this introduction.
Create a Copy of the Repository
A repository, or repo for short, is essentially the main folder of a project. The repository contains all the relevant project files, including documentation, and also stores the revision history for each file. On GitHub, repositories can have multiple collaborators and can either be public or private.
In order to work on an open-source project, you will first need to make your own copy of the repository. To do this, you should fork the repository and then clone it so that you have a local working copy.
Fork the Repository
You can fork a repository on GitHub by navigating with your browser to the GitHub URL of the open-source project you would like to contribute to.
GitHub repository URLs will reference both the username associated with the owner of the repository, as well as the repository name. For example, DigitalOcean Community (username: do-community) is the owner of the cloud_haiku project repository, so the GitHub URL for that project is:
https://github.com/do-community/cloud_haiku
In the above example, do-community is the username and cloud_haiku is the repository name.
Once you have identified the project you would like to contribute to, you can navigate to the URL, which will be formatted like so:
https://github.com/<^>username<^>/<^>repository<^>
Or, you can search for the project using the GitHub search bar.
When you’re on the main page for the repository, you’ll see a Fork button on your upper right-hand side of the page, underneath your user icon:
![]()
Click on the fork button to start the forking process. Within your browser window, you’ll receive a notification that the repository you’re forking is being processed:

Once the process is done, your browser will go to a screen similar to the previous repository screen, except that at the top you will see your username before the repository name, and in the URL it will also say your username before the repository name.
So, in the example above, instead of do-community / cloud_haiku at the top of the page, you’ll see <^>your-username<^> / cloud_haiku, and the new URL will look like this:
https://github.com/<^>your-username<^>/cloud_haiku
With the repository forked, you’re ready to clone it so that you have a local working copy of the code base.
Clone the Repository
To make your own local copy of the repository you would like to contribute to, let’s first open up a terminal window.
We’ll use the git clone command along with the URL that points to your fork of the repository.
This URL will be similar to the URL above, except now it will end with .git. In the cloud_haiku example above, the URL will look like this:
https://github.com/<^>your-username<^>/cloud_haiku.git
You can alternatively copy the URL by using the green “⤓ Code” button from your repository page that you forked from the original repository page. Once you click the button, you’ll be able to copy the URL by clicking the clipboard button next to the URL:
![]()
Once we have the URL, we’re ready to clone the repository. To do this, we’ll combine the git clone command with the repository URL from the command line in a terminal window:
git clone https://github.com/<^>your-username<^>/<^>repository<^>.git
Now that we have a local copy of the code, we can move on to creating a new branch on which to work with the code.
Create a New Branch
Whenever you work on a collaborative project, you and other programmers contributing to the repository will have different ideas for new features or fixes at once. Some of these new features will not take significant time to implement, but some of them will be ongoing. Because of this, it is important to branch the repository so that you are able to manage the workflow, isolate your code, and control what features make it back to the main branch of the project repository.
The primary branch of a project repository is usually called the main branch. A common best practice is to consider anything on the main branch as being deployable for others to use at any time.
<$>[note]
Note: In June 2020, GitHub updated its terminology to refer to default source code branches as the main branch, instead of the master branch. If your default branch still appears as master you can update it to main by changing the default branch settings.
<$>
When creating a branch, it is very important that you create your new branch off of the main branch. You should also make sure that your branch name is a descriptive one. Rather than calling it my-branch, you should go with something like frontend-hook-migration or fix-documentation-typos instead.
To create the branch from our terminal window, let’s change our directory so that we are working in the directory of the repository. Be sure to use the actual name of the repository (such as cloud_haiku) to change into that directory.
cd repository
Now, we’ll create our new branch with the git branch command. Make sure you name it descriptively so that others working on the project understand what you are working on.
git branch <^>new-branch<^>
Now that our new branch is created, we can switch to make sure that we are working on that branch by using the git checkout command:
git checkout <^>new-branch<^>
Once you enter the git checkout command, you will receive the following output:
[secondary_label Output]
Switched to branch 'new-branch'
Alternatively, you can condense the above two commands, creating and switching to a new branch, with the following command and -b flag:
git checkout -b <^>new-branch<^>
If you want to switch back to main, you’ll use the checkout command with the name of the main branch:
git checkout main
The checkout command will allow you to switch between multiple branches, so you can potentially work on multiple features at once.
At this point, you can now modify existing files or add new files to the project on your own branch.
Make Changes Locally
To demonstrate making a pull request, let’s use the example cloud_haiku repo and create a new file in our local copy. Use your preferred text editor to create a new file so that we can add a new haiku poem as explained in the contributing guidelines. For example, we can use nano and call our example file filename.md. You’ll need to call your file an original name with the .md extension for Markdown.
nano <^>filename.md<^>
Next, we'll some text to the new file, following the [contributing guidelines](https://github.com/do-community/cloud_haiku#contributing. We’ll need to use the Jekyll format and add a haiku with line breaks. The following file is an example file, as you’ll need to contribute an original haiku.
[label filename.md]
---
layout: haiku
title: Octopus Cloud
author: Sammy
---

Distributed cloud <br>
Like the octopuses' minds <br>
Across the network <br>
Once you’ve included your content, save and close the file. If you used nano, do so by pressing CTRL + X, then Y, and then ENTER.
Once you have modified an existing file or added a new file to the project of your choice, you can stage it to your local repository, which we can do with the git add command. In our example, filename.md, we will type the following command.
git add <^>filename.md<^>
We passed the name of the file we created to this command to stage it to our local repository. This ensures your file is ready to be added.
If you are looking to add all the files you have modified in a particular directory, you can stage them all with the following command:
git add .
Here, the full stop or period will add all relevant files.
If you are looking to recursively add all changes including those in subdirectories, you can type:
git add -A
Or, alternatively, you can type git add -all for all new files to be staged.
With our file staged, we’ll want to record the changes that we made to the repository with the git commit command.
Commit Changes
The commit message is an important aspect of your code contribution; it helps the maintainers and other contributors to fully understand the change you have made, why you made it, and how significant it is. Additionally, commit messages provide a historical record of the changes for the project at large, helping future contributors along the way.
If we have a very short message, we can record that with the -m flag and the message in quotes. In our example of adding a haiku, our git commit may be similar to the following.
git commit -m "Added a new haiku in filename.md"
Unless it is a minor or expected change, we may want to include a lengthier commit message so that our collaborators are fully up to speed with our contribution. To record this larger message, we will run the git commit command which will open the default text editor:
git commit
When running this command, you may notice that you are in the vim editor, which you can quit by typing :q. If you would like to configure your default text editor, you can do so with the git config command, and set nano as the default editor, for example:
git config --global core.editor "nano"
Or vim:
git config --global core.editor "vim"
After running the git commit command, depending on the default text editor you’re using, your terminal window should display a document ready for you to edit that will look similar to this:
[label GNU nano 2.0.6 File: …username/repository/.git/COMMIT_EDITMSG]

# Please enter the commit message for your changes. Lines starting
# with '#' will be ignored, and an empty message aborts the commit.
# On branch <^>new-branch<^>
# Your branch is up-to-date with 'origin/<^>new-branch<^>'.
#
# Changes to be committed:
#       modified:   <^>new-feature.py<^>
#
Underneath the introductory comments, you should add the commit message to the text file.
To write a useful commit message, you should include a summary on the first line that is around 50 characters long. Under this, and broken up into digestible sections, you should include a description that states the reason you made this change, how the code works, and additional information that will contextualize and clarify it for others to review the work when merging it. Try to be as helpful and proactive as possible to ensure that those maintaining the project are able to fully understand your contribution.
Push Changes
Once you have saved and exited the commit message text file, you can verify what Git will be committing with the following command:
git status
Depending on the changes that you have made, you will receive output that resembles this:
[secondary_label Output]
On branch <^>new-branch<^>
nothing to commit, working tree clean
At this point you can use the git push command to push the changes to the current branch of your forked repository:
git push --set-upstream origin new-branch
The command will provide you with output to let you know of the progress, and it will look similar to the following:
[secondary_label Output]
Counting objects: 3, done.
Delta compression using up to 4 threads.
Compressing objects: 100% (2/2), done.
Writing objects: 100% (3/3), 336 bytes | 0 bytes/s, done.
Total 3 (delta 0), reused 0 (delta 0)
To https://github.com/<^>your-username<^>/<^>repository<^>.git
   a1f29a6..79c0e80  <^>new-branch<^>  -> <^>new-branch<^>
Branch <^>new-branch<^> set up to track remote branch <^>new-branch<^> from origin.
You can now navigate to the forked repository on your GitHub webpage and toggle to the branch you pushed to see the changes you have made in-browser.
At this point, it is possible to make a pull request to the original repository, but if you have not already done so, you’ll want to make sure that your local repository is up-to-date with the upstream repository.
Update Local Repository
While you are working on a project alongside other contributors, it is important for you to keep your local repository up-to-date with the project as you don’t want to make a pull request for code that will cause conflicts. To keep your local copy of the code base updated, you’ll need to sync changes.
We’ll first go over configuring a remote for the fork, then syncing the fork.
Configure a Remote for the Fork
Remote repositories make it possible for you to collaborate with others on a Git project. Each remote repository is a version of the project that is hosted on the Internet or a network you have access to. Each remote repository should be accessible to you as either read-only or read-write, depending on your user privileges.
In order to be able to sync changes you make in a fork with the original repository you’re working with, you need to configure a remote that references the upstream repository. You should set up the remote to the upstream repository only once.
Let’s first check which remote servers you have configured. The git remote command will list whatever remote repository you have already specified, so if you cloned your repository as we did above, you’ll at least see the origin repository, which is the default name given by Git for the cloned directory.
From the directory of the repository in our terminal window, let’s use the git remote command along with the -v flag to display the URLs that Git has stored along with the relevant remote shortnames (as in “origin”):
git remote -v
Since we cloned a repository, our output should look similar to this:
[secondary_label Output]
origin    https://github.com/<^>your-username<^>/<^>forked-repository<^>.git (fetch)
origin    https://github.com/<^>your-username<^>/<^>forked-repository<^>.git (push)
If you have previously set up more than one remote, the git remote -v command will provide a list of all of them.
Next, we’ll specify a new remote upstream repository for us to sync with the fork. This will be the original repository that we forked from. We’ll do this with the git remote add command.
git remote add upstream https://github.com/<^>original-owner-username<^>/<^>original-repository<^>.git
For our cloud_haiku example, this command would be the following:
git remote add upstream https://github.com/do-community/cloud_haiku.git
In this example, upstream is the shortname we have supplied for the remote repository since in terms of Git, “upstream” refers to the repository that we cloned from. If we want to add a remote pointer to the repository of a collaborator, we may want to provide that collaborator’s username or a shortened nickname for the shortname.
We can verify that our remote pointer to the upstream repository was properly added by using the git remote -v command again from the repository directory:
git remote -v
[secondary_label Output]
origin    https://github.com/<^>your-username<^>/<^>forked-repository<^>.git (fetch)
origin    https://github.com/<^>your-username<^>/<^>forked-repository<^>.git (push)
upstream    https://github.com/<^>original-owner-username<^>/<^>original-repository<^>.git (fetch)
upstream    https://github.com/<^>original-owner-username<^>/<^>original-repository<^>.git (push)
Now you can refer to upstream on the command line instead of writing the entire URL, and you are ready to sync your fork with the original repository.
Sync the Fork
Once we have configured a remote that references the upstream and original repository on GitHub, we are ready to sync our fork of the repository to keep it up-to-date.
To sync our fork, from the directory of our local repository in a terminal window, we’ll use the git fetch command to fetch the branches along with their respective commits from the upstream repository. Since we used the shortname “upstream” to refer to the upstream repository, we’ll pass that to the command:
git fetch upstream
Depending on how many changes have been made since we forked the repository, your output may be different, and may include a few lines on counting, compressing, and unpacking objects. Your output will end similarly to the following lines, but may vary depending on how many branches are part of the project:
[secondary_label Output]
From https://github.com/<^>original-owner-username<^>/<^>original-repository<^>
 * [new branch]      main     -> upstream/main
Now, commits to the main branch will be stored in a local branch called upstream/main.
Let’s switch to the local main branch of our repository:
git checkout main
[secondary_label Output]
Switched to branch 'main'
We’ll now merge any changes that were made in the original repository’s main branch, that we will access through our local upstream/main branch, with our local main branch:
git merge upstream/main
The output here will vary, but it will begin with Updating if changes have been made, or Already up-to-date. if no changes have been made since you forked the repository.
Your fork’s main branch is now in sync with the upstream repository, and any local changes you made were not lost.
Depending on your own workflow and the amount of time you spend on making changes, you can sync your fork with the upstream code of the original repository as many times as it makes sense for you. But you should certainly sync your fork right before making a pull request to make sure you don’t contribute conflicting code.
Create Pull Request
At this point, you are ready to make a pull request to the original repository.
You should navigate to your forked repository, and press the “New pull request” button on your left-hand side of the page.

You can modify the branch on the next screen. On either side you can select the appropriate repository from the drop-down menu and the appropriate branch.
Once you have chosen, for example, the main branch of the original repository on the left-hand side, and the <^>new-branch<^> of your forked repository of the right-hand side, you should receive a screen that states your branches can be merged if there is no competing code:
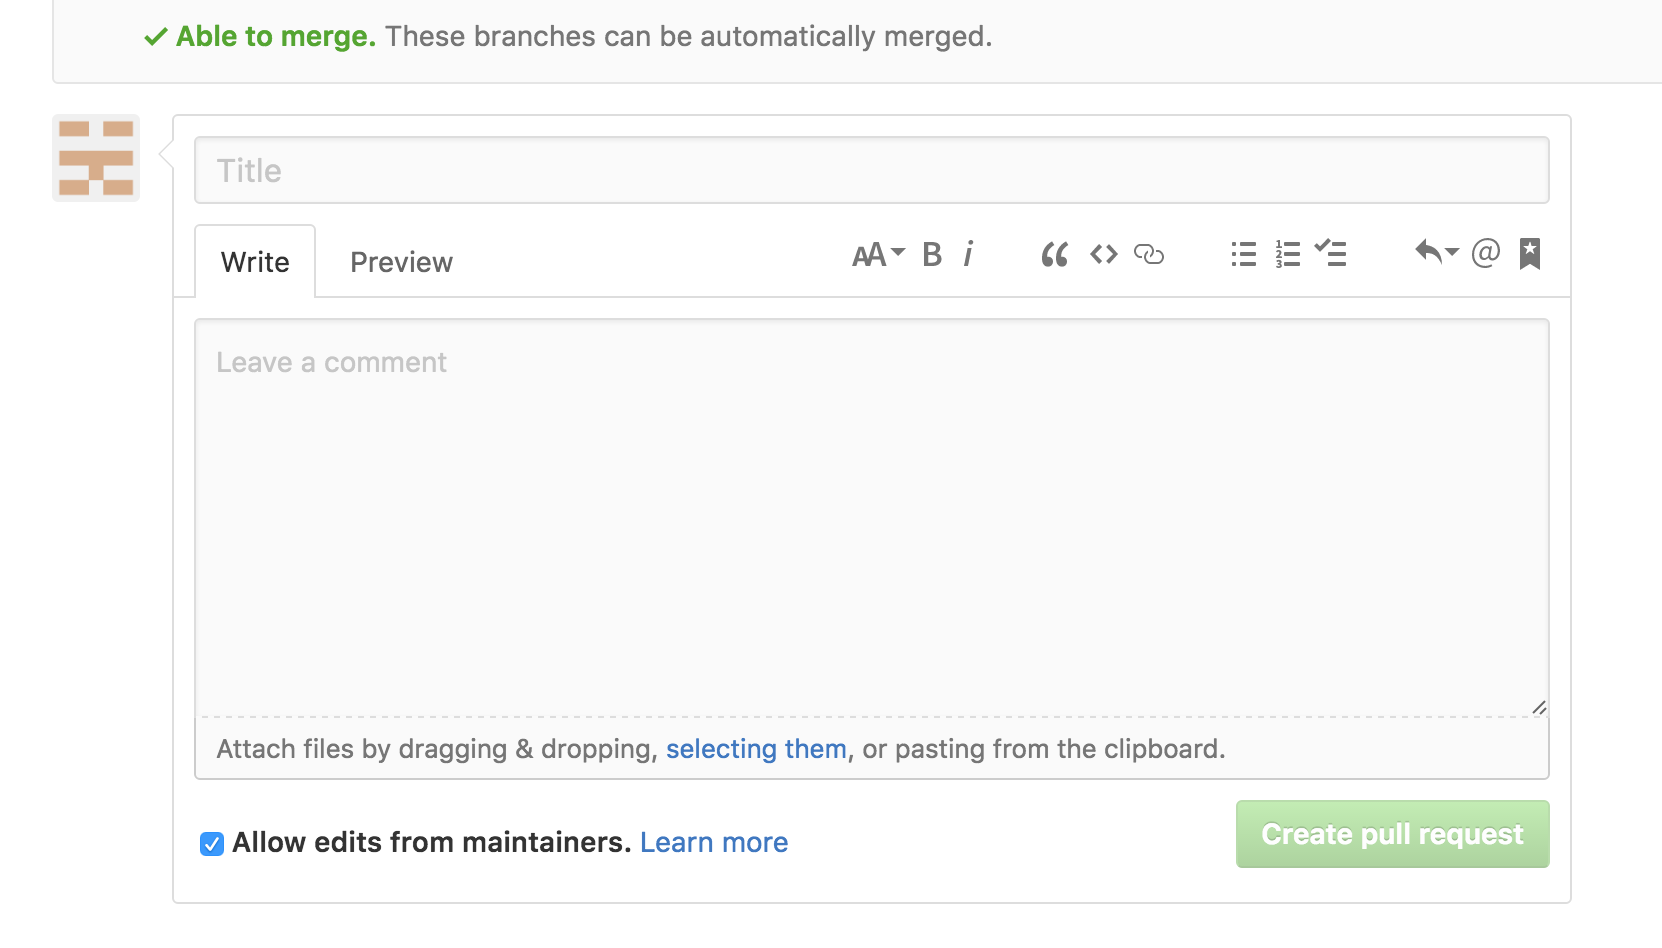
You should add a title and a comment to the appropriate fields and then press the “Create pull request” button.
At this point, the maintainers of the original repository will decide whether or not to accept your pull request. They may ask for you to edit or revise your code prior to accepting the pull request.
Conclusion
At this point, you have successfully sent a pull request to an open-source software repository. Following this, you should make sure to update and rebase your code while you are waiting to have it reviewed. Project maintainers may ask for you to rework your code, so you should be prepared to do so.
Contributing to open-source projects — and becoming an active open-source developer — can be a rewarding experience. Making regular contributions to software you frequently use allows you to make sure that that software is as valuable to other end users as it can be.
If you’re interested in learning more about Git and collaborating on open-source software, you can read our tutorial series entitled An Introduction to Open Source. If you’re already familiar with Git, and would like a cheat sheet, you can refer to “How To Use Git: A Reference Guide.”
A version of this tutorial was published at https://www.digitalocean.com/community/tutorials/how-to-create-a-pull-request-on-github.